
We've purchased her crate online (only $53, for an Intermediate size!), which arrived last week, I got a couple toys for her, and we have already got her food. I know it might be too early to buy food, but the food I've been wanting to get her went on a really fantastic sale for almost $20 cheaper for the 30lb bag. I wasn't about to pass that up. Hey, dry dog food usually sits at the store for months anyway, right? I made her a fleece bed, stuffed with pillows, as well. I've also went upstairs to talk to our weird, night-owl neighbor to warn her about the noise that crate training might bring. She didn't seem to care.
She's become my obsession, and the highlight of my week is when the breeder sends me updated pictures of her. I'll be going back home to California to visit family in a little over a week, and I've already scoped out the nearest pet stores there, too. I hope to bring some really special things back for her. My mother back home says there's a store that sells bully sticks for $1, so obviously, that's going to be the first store I'm going to hit... right after In-N-Out Burger, of course!
But anyway! My Pinterest boards are filled with all kings of DIY puppy bed, treats, and toys now. I wanted to give a recipe a try, knowing it's too early to start baking treats. My mother in California has a dog, and I wanted to try these treats out on her before I go crazy and start making batch after batch of them before Amelia comes home.
Keep in mind, as you read this, I don't cook, and I don't bake. This was actually the result of two previous failed batches of cookies. The first batch, I made too thick, and they turned out too soft and gummy. The second batch, I put too much water in. That batch ended up getting completely stuck to wax paper, and I got so frustrated that I tossed it out. This third and final batch, turned out perfect.
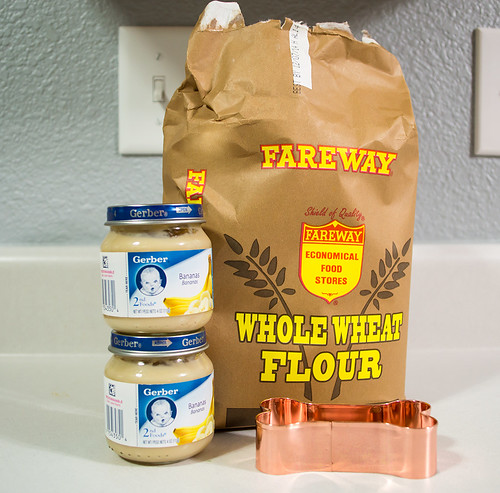
Here's my ingredients. I only used Fareway brand Whole Wheat Flour and banana baby food (don't use anything with onion or onion powder!). Which is awesome, because I love re-using baby food jars. The first time I went buying flour, I accidentally picked up white wheat flour. I don't even know what that was, so I went back and got the actual whole wheat. Oops. I picked Banana favored food, because this batch goes to my tester dog, who loves bananas. For Amelia, however, I think I'm going to try sweet potatoes.
- 2 cups of whole wheat flour
- 2 (4 ounce) jars of baby food
- Dog bone cookie cutter
Let me tell you about this stupid dog bone cookie cutter. I searched... everywhere for this thing! I looked at Walmart, Petco, Petsmart, HyVee, Fareway for any kind of bone cookie cutter, and nothing. My last ditch effort was at the mall, where they have this little store called Kitchen Collections, before I ordered online. They not only had one, but three (!) kinds of them. I picked up a set of 3 different sizes, mainly so I can start with the medium size, and work up to the largest. Also, I didn't want to go hunting for them again. Like, ever.
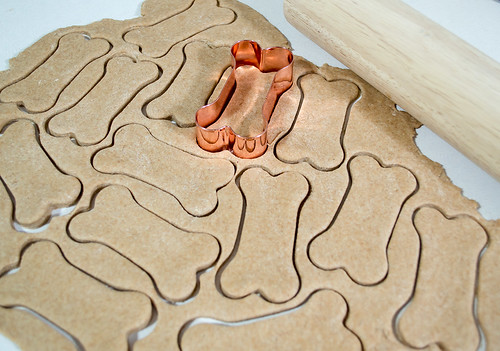
I mixed up the dough with my hands and rolled it out. After so many failed attempts, I was shocked at how perfect this batch of dough turned out. Both batches were sticky, but this one wasn't at all. I had no issues cutting out the dough and peeling them off the counter. Like I said, I'm no baker.
I'm not going to lie. I did not roll the dough out myself. I hate rolling dough out, so I called my husband in to roll it for me. There were times when I thought he was going to break my poor rolling pin, he was being such a brute with it. But, the dough looked good, and my rolling pin somehow survived. Win, I'd say.
These were made about 1/4 inch thick. The first batch was made too thick, and I really did not feel like trying again, so OCD me, literally measured the thickness of each one with a ruler. Anything over 1/4 inch got re-rolled.
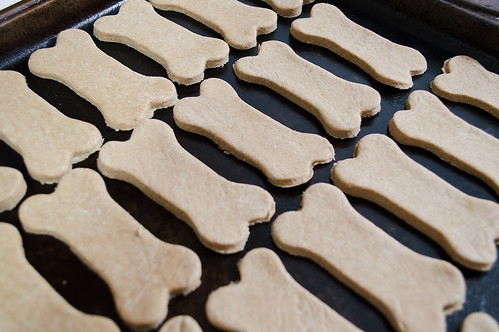
It was also suggested to use parchment paper on a baking sheet to cook them. I didn't have any. I sprayed the sheet with cooking spray, and them wiped all that I could off. Just to get a extremely thin layer of it.
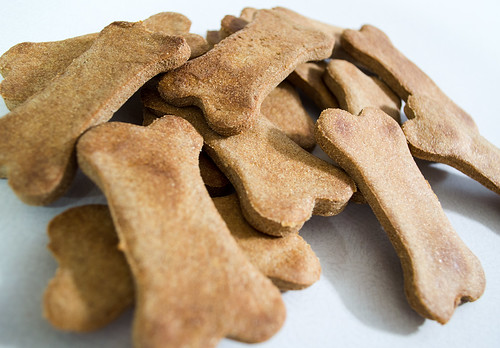
The link I followed from Pinterest suggested to cook them at 350 degrees for 20 minutes. However, mine were soft still at 20 minutes. I wanted mine crunchy. I kept mine in the over, checking on them every 5 minutes or so. I might have taken them out around 40 minutes.
My list of tips, for those willing to try this:
- Might be a good idea to maybe puncture the tops of the biscuits with a fork before baking, so the air can vent through, and maybe not rise any? I might try this in my next batch.
- They will get soft in an air tight container. I follow the original poster's advice, and keep them on a paper bag on the counter.
- Don't make them over 1/4 inch. they won't get hard, and will remain soft and chewy (and might mold easier?)
- Once I poured my baby food into the mixing bowl, I put just a few drops in the jar, closed the lid, shook the water around, and poured what's left in the bowl. Don't do more than just a few drops extra. The dough will be sticky. It will then stick to wax paper, and you'll have to toss it out. I know from experience.
- If you have a Kitchen Collection store near you, go there first before running all over town looking for dog bone cookie cutters.

No comments:
Post a Comment