Social Icons

Wednesday, April 29, 2015

My Nails Today

Once upon a time, I was a serious nail chewer. I had been doing it for as long as I could remember. I never had nails, I'd chew my nails and the skin around them until they bled. On a daily basis. My nails were a serious embarrassment, and every time I went out, or anything, I felt like I needed to hide my fingers. They were horrible looking. Stumpy nails, bleeding hangnails, ugh. The latest photo that I took of my fingers in this state, was when I posted about some knitting projects I made. They looked so terrible then! One day, I decided I did not want to hide my fingers anymore. I made the decision that day to stop chewing on them.

It was difficult to do. I had to consciously pull my fingers out of my mouth most of the time, remind myself to stop. I found that if I kept my nails painted, I was more likely to keep them out of my mouth. Because of this, I bought a lot of nail polish. I was making a good amount of money in a job I hated, so I spent a lot of money on polish. A little while ago, I even took my blog on a tour of my nail polish unit. Taking photos of those, and posting them was just a little embarrassing, I (or my husband) did not realize how much I had... or how much money went towards it.

Nails

While I do not buy any nail polish anymore, I definitely accomplished my goal of not chewing on my fingers anymore. It was a long process of keeping my nails painted, making sure my cuticles stayed moisturized to stop the hang nails, and constant reminding myself to keep them away from my face.

I am so proud of my nails now. I never bite on them anymore. At this point, they actually grow so long that I have to trim them all the back down because they get in the way. A few years ago, I never imagined that I would ever have that problem. My current nails are proof to myself that I really can do whatever I set my mind to. I just need to make a decision, and commit to it, like I did with my nails.

Monday, April 27, 2015

Jawbone Up

As the weather is warming up, and Amelia growing to be such a large dog, I have been wanting to take her out for walks, to burn off some of her energy, and possibly work on getting me slightly more in shape than what I am. At least, once her heat is over. I have also purchased her a Easy Walk Harness, because her Gentle Leader is no longer working for us at all. She pulls way to hard still, even with the gentle leader on - so hard that she's wounding her under eye area. Here's hoping that the harness works better for her!

Yesterday, my husband returned home with a new little fitness gadget that will hopefully be awesome with me walking Amelia. He got a Jawbone Up from someone who did not want it anymore. Last night I did a lot of research about it, and it seems to be something similar to the Fitbit, which I have been wanting.

Jawbone Up

I set it up, got the app downloaded onto my phone, and got my account all up and running. I amm very excited to use this new to me gadget! It seems that it can be a pedometer, fitness tracker, and can even track sleeping habits. From what I have read, it seems to be very good in giving true data. We will see.

I see a lot of fun adventuring with this thing!

Saturday, April 25, 2015

Gasteria Propagation

I have had this particular plant for at least a year. The plant came with a tag, saying it was an aloe vera. Turns out, I recently found out that it was not an aloe, but a succulent called a Gasteria. I have been trying to propagate it by leaves that had been broken off by the cat, and have been having a little success!

I had checked for roots periodically, and you can imagine my glee when I saw a small little green nub at the end of the leaf one day. I went running through the house to show my husband, who did not understand my excitement... at all. Shortly after, it had gotten a foothold in the soil, and it would not lift up easily. The other night, I took out the soil to see how the roots look, and if there was any progress on the next step of propagation coming along.

DSC_2814-2

I was shocked at how awesome the roots have gotten! They are a far cry from the little green nub I saw weeks ago. Apparently, it will take a long time to actually grow leaves, however. Now that I have been looking at the proper name for the plant, and what to expect, it could be several years before I have a large enough plant that would need to be repotted.

So, we will see. Currently, it is in a tiny used Keurig cup that I had on hand at the time, covered by a mason jar to keep humidity up. It is not taking up much space as it is right now, so I will just keep doing what I have been doing with it... waiting.

Thursday, April 23, 2015

More Persian Shields

Towards the end of last month, I purchased a Persian Shield plant from a nursery online. It looked okay when I received it, but for some reason, I wanted a couple more. I have been at my local nurseries, and have had no luck in finding it. I had asked the employees even if they could order it for me. They would not. So, I decided to get a couple more. At the very least - so that I could stop obsessively hunting them locally.

I went with a different nursery this time. I have heard good things about Select Seeds, so I decided to try them out. They had a really good price for the plants, and one of the cheapest places I have found for shipping. I ended up paying just under $21 for the two. It kind of does sound like a lot, but when you factor in how much gas we have wasted in trying to find this plant every weekend, and the cost relative to other online nurseries, this price was phenomenal.

Persian Shield

VERY pleased with these plants. The leaves are not dried out like the last place I ordered from, and these were packaged gorgeously. They each had their own little specially made cardboard box, the soil is still damp, and they came in their own pots. The leaves need to do a little relaxing from the journey they took to get to me, but they look to be in fantastic shape. I will, without a doubt, be back to order more from them!

Their pot and potting soil has been waiting for them for a week, so I am very excited to pot them up into their new home!

Tuesday, April 21, 2015

Amelia's First Heat

The thing I have been dreading has finally happened: Amelia has went into her first heat cycle. I've been really concerned about it because of the messes I have envisioned in my mind about it. However, I have been slightly worried that she hadn't gotten it yet, so I am a little bit relieved. A lot of the goldens born the same month as her had already gotten their heat. My Amelia is a late bloomer, it seems.

Amelia at the Sliding Door

That being said, we are officially confined to the house for the next several weeks, until it is over. It has only been two days, and she is already restless. The only time she goes outside is to go potty. I was told that I shouldn't even walk her by myself outside because a male dog might turn aggressive with me while trying to get to her. I am not taking any chances.

Amelia's Face

At first, she was not doing a good job at keeping herself clean. I was wiping her once in a while, trying to keep the mess on my carpet and furniture to a minimum, but today it seems she is doing much better. She's cleaning herself more often now, and I have not had to wipe her since. If it gets worse, we may need to look at getting some diapers for her.

Amelia's Hind Paws

She is definitely not herself, however. She's more clingy, wanting more attention, and just seeming to be more tired than usual. She just looks uncomfortable all the time since her heat started. Three weeks of this seems grueling, keeping her in the house, her long, sad stares.... I am not sure how I will survive this with her!

Saturday, April 18, 2015

Amelia's Injured Paw Pads

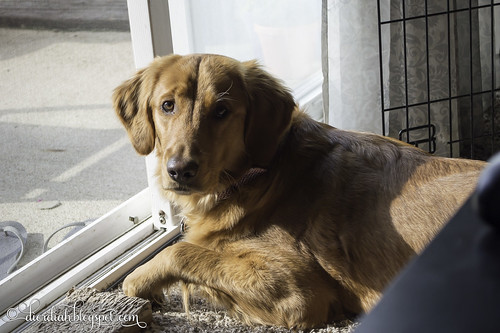
A few things happened all around the same time, so I can't quite pinpoint the cause, but Amelia somehow injured her paw pads! Within a series of days, I bathed her in new shampoo, and we went to the grand opening of our apartment complex's dog park. We have also changed her food over the past couple weeks. I do not really remember when I first noticed her licking her paws, but it was excessive. When I noticed, I looked at them right away and found that they looked really raw. It was not just one of them, it was both front paws, and one back paw. From her licking? I do not know. One paw was worse than the other, part of her front toe pad was hanging off!

So, it could be a variety of things, I figure. A reaction to the new soap? Did she cut herself on the new mulch at the park? She is a completely indoor dog, so her pads are a little dainty. Allergies to the new adult food, even though we did not change brands or formulas? Naturally, I went into panic mode. I researched online, and went into an even worse panic. Dr. Google is horrifying sometimes!

I decided to do a couple home remedies, before I made a vet appointment. If she wasn't getting better by the third day (which was payday), she was going to be taken to the vet. I went to the Dollar Tree, picked up a couple packages of Epsom Salt, and little toddler socks. I also heard a lot about this stuff called "Bag Balm," which is some kind of ointment/moisturizer used mainly for cow utters. Though, it is good for human moisturizing, and can be used on dogs, as well. I hunted that product down, finally found it at our local Walgreens!

My method was simple: After dinner, I filled up the bathtub with about 1-2 inches of water, and poured some Epsom salt in it. Amelia stood in the bath, for a good ten minutes, while I fed her treats to stay in there. After ten minutes, she got taken out, and her feet were dried as best I could get them, then I rubbed Bag Balm on her paw pads, and covered with the toddler socks. She ripped off the socks right away the first time, so we lightly wrapped a layer of tape around the socks. It helped. When we were ready to go to bed, I took off the socks, and made sure she was not licking her paws, until she calmed down and went to sleep. I took them off before bed because I was worried about the wound turning into a hot spot, and also her taking off the sock while I was sleeping and swallowing it. Which would turn into a worse situation. When I woke up, she got more Bag Balm and socks on for a couple more hours. Then the process repeats at night.

Paw Pad

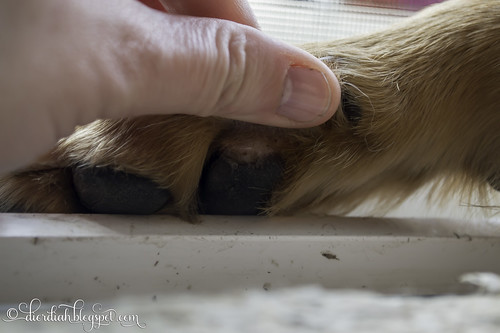
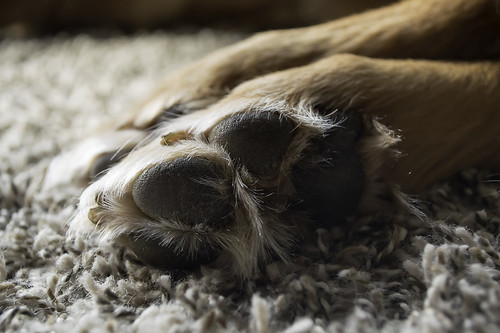
I immediately saw improvement with her paws! The part that was hanging off healed, and now it has turned black again, it's definitely less raw, and I think it is healed enough that we do not need to do our morning/evening ritual anymore. We have not taken her back to the park, or even for a walk since it looked bad, but I think now, it looks okay to start walking her again. The photo is recent, showing her healing. This was the worse paw, you can barely notice where the hanging off part was.

I am, however, extremely nervous about taking her back to the park again, because I really think the rough mulch stuff tore up her pads. But still, I am keeping a close eye on her, making sure there is no more licking, and assuring that it remains healing.

Tuesday, April 14, 2015

Clearance Aloes

It is a known fact in this house that I have a soft spot for aloe vera plants. Last summer, we had went to an event that was all outside in the middle of the summer, and we were out there all day. Of course, I came home with the worst sunburn I ever had in my life. It was so bad that my face had swelled up. The only thing that made it feel better was some aloe vera gel that we had purchased. Ever since then, I had been wanting to grow my own aloe, in case I need it again. Now I find myself with a total of seven aloe vera plants, in three different species.

When I was browsing through my local Lowes, I came across two very sad looking aloes, on clearance for $1 a piece. They each had several dead, shriveled, brown leaves, as well as several leaves that were broken towards the top, but other than that, they didn't look "sickly." They each had new growth, and it looked healthy.

Clearance Aloes

I repotted them, took off the bad leaves, and all the dead ones. I left some bent and broken leaves on though, thinking that the plant can still get nourishment from them, and not wanting to give it too much of a shock.

Here's hoping that they will continue to thrive, now that they are in a new home, and all it's dead leaves pruned off of it!

Monday, April 13, 2015

How To: Make Layered Lace Flowers

As those who read my blog know, I am huge on the thrift store shopping. A lot of my crafting supplies are either given to me, or bought from thrift stores. I am particularly fond of vintage sheet music and lace trims. That being said, I have accumulated quite a bit, that I have not even used. My husband was beginning to call me a hoarder, and I can't have that! I sat out to make use of some of my crafting products.

Layered Lace Flowers

I made a bunch of what I call Layered Lace Flowers! They all turned absolutely gorgeous, I am floored at how awesome each one turned out. Usually, things look better in my head than they do in real life, so the fact that these turned out the way they did is incredible. However, when I think about how I made them, I realize that each one took quite a bit of time. I ended up making these over a course of several days, really. I measured, cut and sewn up each one while leisurely sitting on the couch, watching television. Next was coloring all of them, which required time to dry again. Then all the hot gluing. But it was all worth it!

Close Up 1 Of Layered Lace Flowers

I simply ADORE how this one came out. I made them in all shapes, sizes, and colors, but some reason, this one is my absolute favorite. I love the way the pink looks, the tulle, size. Pretty much everything.

Close Up 2 Of Layered Lace Flowers

I was surprised at how much I found I like this one, too. The other one I could justify, because it is pink, and I love the tulle look. But this one, I did not think it would be my style. But no! It looks like a little circle of happy!


I actually did a tutorial on how I made them! The camera kept focusing every time I moved, though, so you might not like the tutorial if that bothers you. (I learned to take pictures with it, not video - so I am trying to learn video now). If you enjoyed the video, please subscribe to my channel!

Enjoy, and I hope the video inspires you to make your own in some form!

Wednesday, April 8, 2015

Update on Patio Plants

Let's talk more plants! I posted a little while ago, progress on my first bare root rose. Not much has changed really, but I have noticed the growth on it getting larger, and new growths are showing up. Exciting, for me who has never had a rose bush before!

Update on Double Delight Rose

I am kind of disappointed that it isn't growing faster, as people are already seeing blooms on their roses. I need to learn to be patient! Hopefully, when it does bloom, it will be spectacular and totally worth the wait. It has been a bit of a pain, the apartment managers has been telling people to clear off their patios, because they are power washing. My husband, every morning, had been lugging the huge, heavy pot in the house in the morning, and back outside when we decided they were not going to get to us that day. I imagine that all the moving around of it might have hindered the growth progress of it. (In the end, we never got our patio power washed, and I have given up on moving the plants around. At this point, if they want to power wash, they can work around my potted plants.)

Daffodil

I had purchased daffodil bulbs during last fall, and for some reason, I never got around to planting. I had put the bulbs in the refrigerator, and forgot about them. Cleaning out the fridge, I found them again. They were trying to sprout in the bag, so a few weeks before spring started, I decided to plant them in a small pot, not expecting anything to happen with them. All the information I could gather, said that they need fall weather to grow roots, to get ready to flower in spring. I read that I might get leaves, but that is it. I am amazed to see at least one looks like it is thinking of doing something! It looks like it's wanting to flower! Exciting!

Colorful Pots

Here's the current status of my "patio garden." I have strawberries in the medium red pot, that I had bare root plants for. Not sure how well they will grow, considering the ones I see in the stores are already much better off than what I currently have. I recently added a lavender, and a sweet mint plant. Just got them over the weekend, and promptly planted them. (Don't mind the mess of potting soil on the concrete, I do need to get my butt out there and sweep it up)

Trial and error is how it goes with my gardening experiences! I am still doing a lot of Googling with my plants, making a serious attempt to do things right! Maybe soon I will need to do a post on my indoor plants, including my crazy, overflowing, windowsill.

Friday, April 3, 2015

First Pocket Letter

With smashbooks, junk journals, my dog, and gardening, one would think I have enough hobbies, right? Well apparently not, because I just picked up yet another craft! There is a new thing going around, called Pocket Letters! I have been hit hard by this craft, as I adore it! I can really get my creativity going with these pocket letters, as they are small, and much easier to commit to, than say, a junk journal or something similar. I have mentioned before in this blog that I really enjoy having the instant gratification feeling, and these can be punched out in a couple of hours, using all my existing supplies.

Basically, a pocket letter is paper, divided up into a trading card protector, and decorated. You can decorate them however you like, add whatever embellishments you want to add. You can add little goodies in the pockets, such as tea bags, die cuts, or whatever else will fit in the pocket! The only requirement is that you have to add a letter into a pocket. Because these are, after all - pocket letters. Once you finish the page, you send it out to a snail mail pen pal, or for a one time swap with someone.

In-Progress Pocket Letter

This is my first pocket letter, before I really embellished it. I had cut up my pieces of patterned cardstock, stamped each one with a really beautiful, large script stamp, and inked the edges with some Distress Ink.

After I got all of that done, I really started to embellish it. I added a envelope using my Envelope Punch Board, some lace edgings, keys that I cut with my Silhouette and inked with Distress Ink, a small tag with washi tape samples, glued a couple of doilies (again, cut with my Silhouette and tea-dyed), and added a few embellished paper clips. It is so pretty, I can't get enough of them!

Finished Pocket Letter

This one hasn't yet found a home to be sent to. When I am ready to send it out, the awesome part of pocket letters is that they fold up into thirds, and fit brilliantly into a #10 envelope, for easy sending to your swap partner!

If you want to know more about Pocket Letters, there is a huge explanation of them, along with a video, an FAQ, and everything at the creator's blog. Also, if you start making them, definitely go and join the Pocket Letter Pals Network!

Wednesday, April 1, 2015

Amelia's First Birthday

Amelia officially turned one year old on March 29th! We had a little party for her, with a yummy treat, and some new toys! She loved her toys, and loved her treats! Sometimes it feels like she has always been a part of our lives, other times, it seems like just yesterday, I was fighting with her about potty training. I have been expecting her to go through her "teenage" phase, which is supposed to be terrible, but I am very surprised that I haven't seen much of it yet. She is terrible on walks, but other than that, not much teenage phase at all!

First Birthday Cookie

Her birthday cookie! I really tried to get a good photo of this. I have seen many really cute pictures of a treat with the dog in the background. However, with my camera, I could either have the cookie in focus, or Amelia. Did not go well, but still cute! I loved the cookie, and at the rate that she ate it at, I am assuming she loved it as well.

Crazy Eyes

We also got her a toy, and my family in California also sent a toy. I ended up putting both toys in the gift bag, and just let her "open" it, by taking out whatever toy she wanted. Naturally, she had no interest in the toy that we bought her, she wanted the toy that her Grandma sent for her. She spent a long time playing with it!


As a little bonus, I took an almost 9 minute video of her opening her toys, and playing with her favorite toy out of the bag.
 
 
Blogger Templates